Showing posts with label Serro Scotty. Show all posts

Tuesday, June 17, 2014

Patty's Place: Where We Are Today

Well, we've got four glamping trips under our belts now, and I think it's high time we had a Patty update! The old girl's looking pretty good these days, and really, most of the big things are finally crossed off of our list! A friend of ours has repaired her exterior lighting, replaced her brake lights, and packed her bearings. Still lots of finishing touches to do, but in the meantime, she is totally, comfortably, wonderfully glampable and ready for more fun!

These pictures were taken on our most recent trip, not staged, so forgive the weird lighting. Probably won't bother anybody but me - well, maybe a few other photogs out there - but when there are a million different light sources mixed with lots of small tucked away hidey-holes, it's sure hard to get consistent pictures! Oh, and for those of you working on a restoration of your own, I'll include a few pictures of simple storage ideas that we've incorporated.

And now, may I present to you, the new and improved:

Patty


Stay in the loop >>> BLOGLOVIN' | FACEBOOK | INSTAGRAM | PINTEREST | TWITTER

Wednesday, April 30, 2014

More Improvements for Patty

As we raced to the finish (I use that word loosely...not sure there will ever be a finish line) I got more excited about actually camping ahem, "glamping", and less excited about taking boring documentary pictures of the final details of Patty's spruce up. But I do have a few for you today. 

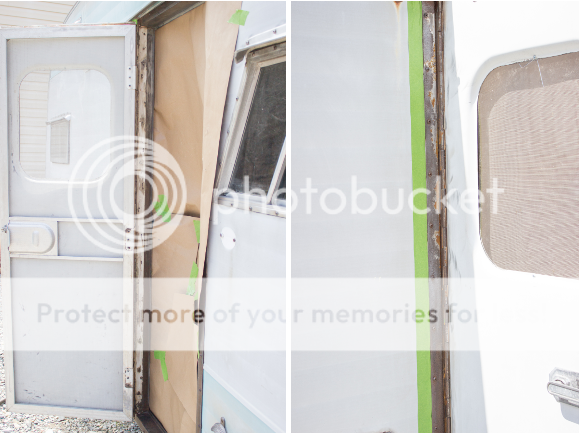
First: her rusty old door frame.
We thought of taking it out, stripping it, painting it, and reinstalling it. We thought about replacing the whole enchilada. But we settled on buffing her really well with a circular wire brush attachment on the drill, and doing our best to spray paint it while still all assembled. Not a perfect job, but 1,683,492 times better than it was! Used Rustoleum Hammered Metal in Silver. This paint is stellar at hiding imperfections btw. I like using it for all kinds of non-camper-related projects!

So here are a few befores:


And an after-as modeled by the Glamping Bichons, Chester and Caroline:

Side note: I also sprayed the screen door (though the screen really needs to be replaced), and WD40-ed the sliding latch access panel, and it's practically like new - except for the loose screen! Wish I had a good "before" of it, but trust me, it was looking rough.

And while we're talking about paint, let's just jump on over to the whole ball of wax: her super-cheap-done-by-an-amateur  BODY PAINT JOB! Don't look closely...I feel about as fond of frog-taping things off as I do about going to jail, so yes, I was a bit sloppy. But, BUT! How much better does this old girl look???

Before:

After:

Yay! Yay! Yay! We still have much to do, but I'm so happy to have this large item crossed off the list. It took me about a week of intermittent painting. I started by washing the whole thing down well with windex and an abrasive rag, sanded out some rough patches, taped everything off, and then sprayed with Rustoleum High Gloss White, and Krylon Ocean Breeze (which is super close to the original Scotty aqua). I used a trigger attachment which saved my pointer fingers (best $2 you'll ever spend), and did it all. by. my. self. Note that this is not a long-term paint job. We'd love to get it professionally done one day, but for now, it is a ginormous improvement, and will keep us from being the laughing stock of every campground we roll into :-)! 

That's all for today folks. The next installment of Adventures in Patty will be an exciting one: Her Maiden Voyage!


Thursday, March 27, 2014

Patty Progress: Cabinets

We've been working hard over here during snow days, and nights, and weekends trying to get Patty ready for the warm weather and the beginning of camping season!

The most notable thing we've accomplished of late is the refacing of the cabinets. Though not a difficult job, it took several days to complete since there was wait/dry/harden time in between each step. But WHAT a difference they made!


And since I actually cleaned up the mess a bit in there (which lasted all of a couple of hours...) I thought I'd take a few pics of the rest of the place. You'll see a glimpse of the new flooring underway!


And I'll end with a side-by-side "before" and "after" of the cabinets. Slight improvement, no?!


Monday, March 24, 2014

Why "Patty"?


In the vintage camper world, people name their campers. By a happy coincidence, I happen to love naming things :-). Our cars are named, our lawn mower is named, our computer is named, etc....

So coming up with a name for our little Scotty was quite natural. Some of you may know that our home/land is named "Windy Poplars" (hence the blog name). It was named after the place Anne of Green Gables lived while teaching in Summerside (I've been an Anne fan since I was a little girl).- Because of the strong gusts of wind we can get living in a hollow, and as an ode to the many beautiful poplar trees we had to cut down while building our house, the named seemed a perfect fit.

Fast forward to our camper naming process, and three thousand rejected name submissions later (the huz can be a hard sell in such matters), my thoughts turned back to the Anne books. While Anne was in college, she and a few friends lived in a darling little white cottage named "Patty's Place". It was the lone matriarchal house left on a street that had since become a built up ostentatious avenue of millionaire's mansions.  Patty's Place was a sweet, small pearl among the bright flashy gems.

If you are lucky enough to be wandering through a campground and happen upon a little vintage canned ham, it looks very much like a teeny-tiny little cottage, half-buried in the sea of fancy mansions-on-wheels that cost more than our actual home!

So will be our little "Patty's Place".

A small oasis of peace and refuge. Our happy little home away from home. Perhaps without a big screen TV, recliner, or wine fridge...but our special mini cottage nonetheless. Ready to be filled with memories born from the joys that are found in simplicity.

Of course, you can call her "Patty" for short.


Friday, March 21, 2014

Operation Tiny (Boring) Details

I've resolved myself to the fact that there are LOTS of little details that will not be taken care of before our maiden voyage. And that's ok. Patty will probably always be a work in progress. To give you an idea of the minutia we've been working on lately, here are some pictures:

Patty has a LOT of metal trim. And over 40+ years, metal trim starts to get a little worse for wear. We debated taking it all out, spray painting it, aluminum paint-ing it, buffing it, or just leaving it alone. Lots of the window trim will eventually be covered by curtains, and so we decided to go the buffing route. We knew it wouldn't achieve perfection, but it sure helped!

Here's a before:


 And an after:


And a window before:


and after:


We used a combo of steel wool, and a metal brush on an electric drill to get things shiny again. SUCH a difference, right?

In slightly less exciting news, Jesse took out and butyl-taped three of the windows (so they don't leak), and replaced the broken glass in another.

And in slightly more exciting news, we also installed a punched-tin-look backsplash (don't mind the large canister of anti-bac wipes)!


Thanks for checking in on our journey! More to come...

Tuesday, March 18, 2014

Operation Paint!


Once the demolition was done, it was time to start fixing things up! Before we did anything cosmetic, we hired another friend to come completely update Patty's electricity and fixtures. So now we know all the wires, lights, outlets, etc. are up to snuff. Wish we had added one more outlet, and one more light, but se la vie.

We also had a friend cut down the upper bunk to make a small storage shelf, and replaced the hole left by the stove top with a butcher-block counter slab.

After that important behind-the-scenes work was taken care of, we were chomping at the bit to paint the interior. While we knew there would be some scuffs and bumps along the way since we still had so much work to do, we really wanted to get a good coat of Kilz on her to help get rid of the old-lady smell, and after we had that up, we couldn't stop. :-) Fast-forward through some tedious hole/scuff/dent/nail patching and consequent sanding and... let's paint!!

We chose a lovely off-white called "Gray Mist" (Benjamin Moore) that we had previously used in our house for the walls, and a soft, creamy mushroom-y color for all the build-outs. We took a risk and tried out that new Glade paint add-in (Lavender Vanilla) for the first time, and I am SOOOO glad we did! It smells amazing in there now! It only lasts a short while from what I understand, but sure makes working in a confined space much more pleasant.

You'll see from the photo that we replaced the old fridge with a newer dorm fridge that we already owned.

Makes such a difference, no? Patty instantly went from "I can't wait to get out of here, it's so old and gross" to "What a lovely, serene little fixer-upper slice of camper paradise". I love the power of paint.

And for a reminder of the BP (before paint):


And after:


Thursday, March 13, 2014

Operation Demolition


This vintage camper renovation business has been slooooowwww going. Let me tell ya. Not for the faint of heart (or the instant-gratification-seekers). So many of the projects are small yet tedious, and the sheer volume of decisions that need to be made (should we keep the original ______, try and restore it, or just go buy a new one?), would make your head spin.

But besides all the un-fun bits, it really has been exciting to see things slowly coming together. Starting at the very beginning, we:

+ Cleaned out the previous owners paraphernalia, sorted through it, kept what we wanted, and pitched the rest
+ Shop vac-ed every square inch of the old girl
+ Did a good 409 job of washing down every surface we could

 and then the demolition work began...

+ My dad came over and helped remove all of the cabinet doors, light fixtures, hardware, and stove top
+ We disconnected the old gas lines
+ Removed the old furnace and fridge (that was a job!)
+ Removed a little damaged wood, and replaced it

and I took nary a picture of the whole thing.

More to come (with pictures! I promise!)...

Monday, March 3, 2014

A Proper Introduction


 If you follow me via Facebook or Instagram, chances are, you have already "met" Patty. But for the sake of recording this journey in an easy-to-access format for future reference, I'd like to back up a bit on our vintage camper renovation journey, and do a bonafide before post!

Here is how she looked when she was delivered to our home:


 Yes, we had our rose colored potential glasses on when we bought her! :-) Believe it or not, of all the Hilanders we looked at on our journey, this one was in the best shape. The previous owners were using her for storage, and we had to really dig through piles of stuff to even find the bones. But we liked what we saw, and thought we were up to tackling the required renos with some help from our skilled friends, so we held our breath, and jumped into the vintage camper world with both feet!

So meet Patty:

A 1966 Serro Scotty Sportman Hilander 13' Camper


 Much more of her story to come...